Wednesday, March 27, 2013

Busy, Busy Bee

I Love my Azaleas!
Things have been slowing down at the tax office that I work at, just in time to try to keep up with all of the things that are going on at the homestead. Notice, I said try. I am still falling behind! Coops need to be built, fences put up, and gardens tended to. None of the projects I needed to do over winter were accomplished. It seems that we either have the time or the money, but never both at once. Oh well. All in good time. I have still been busy!

The turkeys are doing great! Two of the Bourbon Red Toms are destined for the chopping block in a couple of days. There are just too many toms for my 3 poor hens, and they are fighting amongst themselves. Choosing which ones will go is difficult. Turkeys really are easy to get attached to, but this has been the plan for them since we got them as poults. I keep reminding myself that the life that they have had is turkey paradise and their death will be as painless and free of fear is death could possibly be. I refuse to give money to factories that raise birds any differently. I also don't want to put those unhealthy birds into my family's bodies.

The second generation of turkey-heads are in the incubator! I set 18 turkey eggs on the 22nd and their hatch date is April 19th! I have not separated the breeds yet so they are going to be a mix of Bourbon Reds, Bourbon/ Slate crosses, and there may be a blue slate or two in the mix. That is doubtful though because my Self Blue tom, Yellow, isn't the alpha tom and despite how hard he tries, he usually doesn't get mating privileges. One of my next projects is to build two small hoop coops. One of them may be used to give Yellow and Miss Tallow the privacy they deserve and, hopefully, give me the Blue Slate eggs I so desperately want! I may increase the gene pool by buying eggs from a friend of mine who also raises them. Hopefully, most of the poults hatched from this batch will be sold and the next batch will be used to increase my breeding stock.

Scissorus
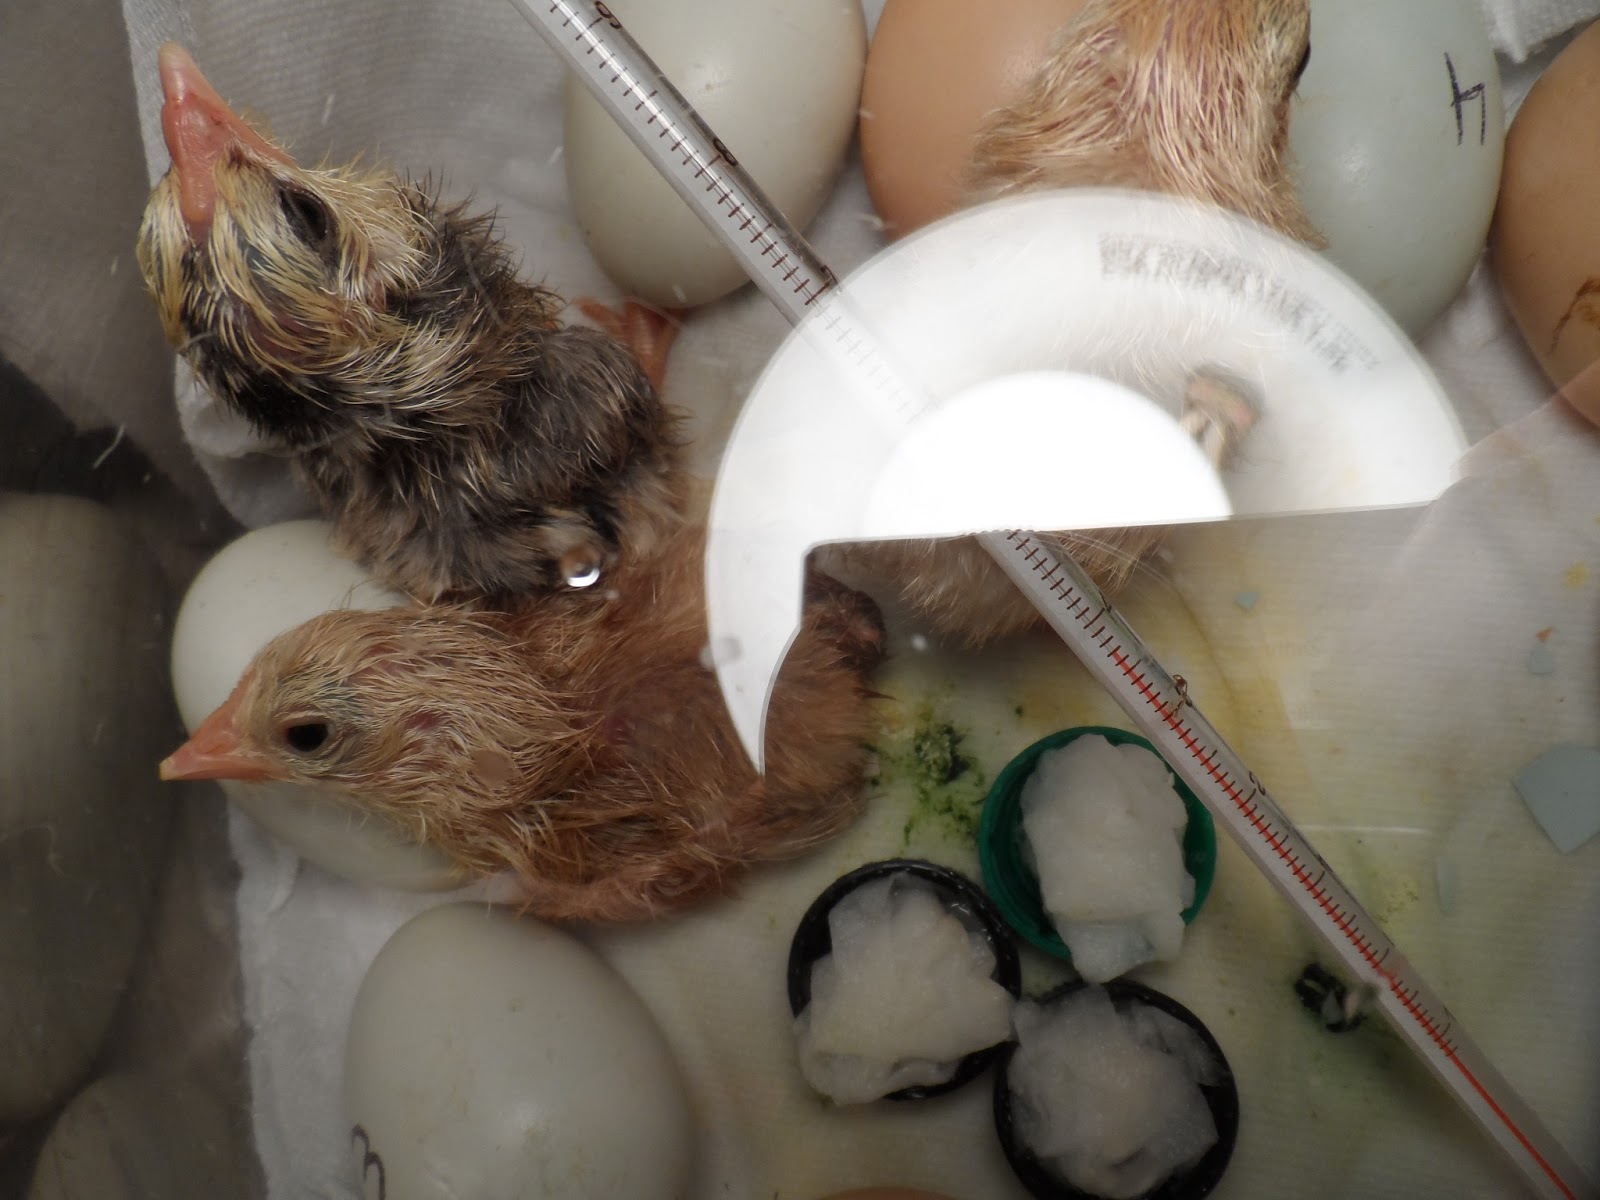
One of the three chicks hatched in my emergency incubator, named Scissorus (Keegan said he was Roman), had scissor beak. I tried to feed him and give him water, but he wasn't doing well and his beak got worse every day. He didn't make it. The other two (both roosters, BO/BO and Einey EE/Ruthie NH?) are doing wonderfully, and we had a wonderful surprise last week when another egg from the emergency batch hatched! They have a cute fluffy little brother or sister (EE Greta mom- BO Jack dad). The rest of the eggs were duds, but I am overjoyed to have saved this many of them!
Keegan, INSIDE the chicken tractor playing with the babies.
Coincidentally, this was shortly after he he told me that he
doesn't actually like chickens (I asked him to feed them). <3
The "Outside Babies" are doing well and are getting HUGE! They will be too big for that chicken tractor soon. The other hoop coop I am going to be building will be for most of them. A few will be going into the project after that: boxes that fit directly in my raised garden beds so they can scratch around, till and fertilize the soil, and get rid of any bugs or weeds that are in there. My garden beds should be ready to go soon! This morning when I was feeding them before work I noticed a single bloody-ish looking stool in the coop. I have noticed the silly things hopping on top of their waterer, even after I raised it off of the ground to keep it clean, and are pooing in the water. I'm worried that one may have coccidiosis, which means they all likely do or will, so I treated the whole flock with Sulmet. I will treat them again when I get home. They are on medicated feed but when they are this young I don't like to take any chances. I don't give medication for the sake of giving medication. Not to myself, my family, or my animals. That is why we have the super-bugs that we do now-a-days. None of my adult birds are on medication, but babies are much more prone to getting sick, regardless of how well they are taken care of. They are all taken off of medicated feed when they are 8-10 weeks old and their immune system is stronger. I tried giving the babies unmedicated feed last year and nearly lost my whole batch to cocci. I am a fanatic about keeping coops clean, but apparently sometimes that doesn't completely eliminated the risk. As icky as many people think it sounds, it is VERY important to keep an eye on your poultry poo! Sometimes that is the first, or only, sign that something is wrong. It also helps to catch things early enough to do something about it!

No matter how many egg baskets I get, this is how my eggs
usually get carried to the house. :)
The adult chickens are producing lots of eggs and they are selling really well! I have to make sure to keep some back for us! Our foster puppy, Chicago, has been fighting Pneumonia since we brought her home. We have had her for nearly two months and her improvement is amazing! She couldn't breath through her nose at all when we first got her, and would not eat. She was losing weight rather than gaining it like a puppy should. After changing her antibiotics, she showed a little improvement with her breathing, but not much with her eating and weight gain. I gave her wet food, dry food, NutriCal nutrient supplement gel... nothing seemed to work. I was really getting worried that she wouldn't make it, simply because she wouldn't eat! Finally, not knowing what else to do, I started giving her boiled eggs. Farm fresh pastured eggs are packed full of nutrients and protein. She ate them! She started gaining weight and getting her energy back immediately! She also got her appetite back and began eating like a horse! She goes through more dog food than I think she has room to put it in her bony little body, but she is increasing the space every day! She is on another round of antibiotics to try to get rid of that last pocket of fluid in her lungs, and her medicine is delivered twice a day, you guessed it, hidden in the middle of a boiled egg! All the antibiotics in the world wouldn't have helped her without her getting the nutrients that her body needed to give her strength to fight the infection. Ah, the power of eggs! She is going to be healthy enough to be spayed soon and then will be on her way to Maine to find her new forever family! I love happy endings!
From bottom to top: Elliot, Chicago, and Ari is hiding way in the back. 

All of Sunflower Hill is covered in snow white dew berry
blooms! What could be better? The whole place
being covered in dew berries soon! 
Speaking of happy things, the seedlings I planted are still alive! Yes, I am thrilled about this! I love growing things, but starting seedlings inside has always been my downfall. They always start out strong and then wilt and die. The tomatoes are getting really big and the peppers are looking dark green and strong. All except for the jalapeno peppers, none of which came up at all! I'm probably going to have to replant those. Some of the eggplants failed to come up, as well. I am loving my new seedling shelf in the kitchen! I think that the space put aside just for them in a draft and bump free area, and the shop lamp hung over the trays, might just keep my seedlings from dying before they get planted! The strawberry plants have tiny green strawberries and flowers on them. Now I need to fence the strawberry patch off so the chickens don't get them all before I get any this year! The peas have sprouted, the brussel sprouts budding, and I got my first little bunch of broccoli the other day! I am counting down the days until I get some fresh dewberries!

All in all, everything here on the homestead is bustling and growing! That is what spring is all about! I am loving life, busy busy busy as it may be, up on Sunflower Hill!

Wednesday, March 20, 2013

Shipping Hatching Eggs

I sold my first hatching eggs! I had not gotten my incubator ready and I really wanted to separate the Bourbon Reds from my last two Blue Slates so I could try to increase my breeding flock, but I really hated to waste perfectly good fertile eggs. I thought that surely someone would be interested in them, so I listed them on the local poultry swap Facebook page. I didn't have high hopes that anyone would want to buy my mixed breed turkey eggs, but figured that someone local would at least save money by not having to pay shipping. The response was amazing! And most of them lived several hours away and were willing to pay for shipping! My sweet little turkeys have always been impressive to me and people would have thought that the eggs were made of jewels or gold as excited as I have been about them, but I was a bit surprised to see that others shared my point of view. I have a waiting list of people that want me to get in touch with them when I have more eggs or when I hatch out babies. I'm kinda worried that I might not get any of my own! I'm going to have to put some in my incubator as soon as I get them separated before I sell more because I don't know how long they will continue to lay.

I made sure that the buyer knew the risks of shipping eggs. The USPS is the only service that will ship hatching eggs and they are not always the most gentle with packages. It makes me a nervous wreck when I order chicks, but they are loud and make it difficult to forget that the package is fragile and needs to be processed quickly. Even so, I had a box of chicks lost in the mail last year. I called everyone I could find a number for, eventually getting in touch with the person in charge of postal service for the entire state. By the time we located them and they were sent on to me they had been in the mail for more than 3 days and over half of them were dead. The hatchery was wonderful and gave me a full replacement, but it didn't make me feel better about all of those poor chicks dying needlessly. Loosing or smashing the box aren't the only things you have to worry about when shipping eggs. Temperature fluctuations, shaking or jarring of the box, and even turning the box upside down for long periods are enough to damage the eggs and make them unhatchable. The air cells in the eggs need to remain intact. Even if the eggs are not cracked or broken, the contents can be scrambled inside the egg!


I went to extremes to ensure that the eggs arrived in one piece. I found a small box that all of the eggs would fit in with about twice the amount of room than the eggs would need. I padded the sides and bottom of the box with foam. Then, I wrapped each egg in a sheet of bubble wrap and taped it. The wrapped eggs were placed on their sides (I figured that it was more likely for the USPS to turn the box upside down than sideways, upside down would disrupt the air sac). After covering the wrapped eggs with another sheet of foam, I taped the box up well. I wrapped that box in a larger sheet of bubble wrap and placed it inside a larger box that had been lined with crumpled up shopping bags (I hate paying for something that gets thrown away when I can reuse something that would have been thrown away or recycled, anyway!). I padded the entire box with the crumpled shopping bags so that there was no movement of the inner box and I felt that it would add enough of a bumper area, including the top of the box. I then took the box to the post office and had them tape it closed really well for me. I wrote on the top and all four sides that the contents were fragile and that there were live embryos in the box. The postal worker told me that it is actually illegal to ship live embryos, so I made sure I added on the outside of the box that they were hatching eggs. I wanted to make sure that they would not X-ray the package and damage them in any way. I had them shipped express and asked them to hold the package at the post office, rather than having it ride around even longer, on potentially bumpy roads, with the postal worker, and the have it delivered in conditions that may not have been favorable. I put the customers phone number on the box and wrote that they should call her on arrival.
 Because there was tracking on the box, I knew when it had arrived at the post office. I texted her and made sure that all of the egglettes had arrived and she was happy with her order. She said they all made it in perfect shape, and that her and her children were really excited about hatching turkey poults! Of course, they could be internally damaged and it not show on the outside. Unfortunately, turkey eggs are really too thick to candle, so we won't know for 28 days. I sure hope her and the kids get to enjoy some sweet baby turkey-heads soon! She promised to send pictures of my grand-chicks if/when they hatch! I think I am just as excited as they are! I wish them all the luck in the world and hope that they enjoy their round-headed babies as much as I have enjoyed their parents!

Saturday, March 9, 2013

Spring time!


 What a beautiful spring day it was today! The feeling of a refreshing warm day spent outdoors after being cooped up inside for what seems like forever, is priceless. The blueberry bushes are in bloom and the bees are busily flying from flower to flower, happily pollinating them so I will have delicious blueberries this summer. I fertilized them earlier this week and today they got a nice long drink of water. The strawberry patch, garlic, brussel sprouts, broccoli, and flower beds had fertilizer applied today as well as a healthy drink.


 The babies got to come outside for the first time today! They are feathering out nicely and since it was warm today I opened the hatch and let them out into the chicken tractor run. The other chickens came over to visit them. The hens really weren't too interested in them, but the roosters were fascinated. Especially Jack. He loves babies. He is such a good rooster! The babies flew around and has a swell time while I cleaned out the brooder.

I dug carrots today, with help from the turkeys and my newest foster little Chicago (whether I wanted it or not...). I was really impressed with how many I got! While I was digging them I went ahead and turned all of the soil in that bed over and replanted the bed.
 

I planted spinach in one third of the bed, lettuce in 1/3 of it, and in the back I planted sugar snap peas and made a tee-pee for them to climb. It is really too late to plant them but Keegan loves them and I thought it was at least worth a try. In the bed behind that is broccoli and to the back left are brussel sprouts. They are plants that I planted in October of last year. They have been slowly growing all winter and I am hopeful that they will still produce something.

I was feeling so productive when I got done cooking dinner that I even made pizza dough for dinner tomorrow ( Keegan has a soccer game and I know it will be late when we get home), baked pumpkin bread for breakfast in the morning, and baked Italian bread. Brad got into it before I could take a picture. He tends to wait by the oven for it to get done.


I planted Amish paste, Cherokee purple, and German stripe tomatoes, bell, jalapeno, and pepperoncini peppers, and eggplant seeds on Tuesday, and I noticed that one of the Amish paste seedlings has broken the soil! I hope the rest of them join him soon. My next project is to build a shelf for the kitchen and hang the shop light I bought over it for the seedlings. After that I am going to work on new (smaller) hoop coops for the chicks once they outgrow the chicken tractor, and maybe for the turkeys until then so I can separate breeds while they are laying. Such a beautiful and productive day!

Friday, March 8, 2013

Emergency Egg Incubator

Home-made emergency incubator
First pip!
The first baby fluffing up


About a month ago I was having a really difficult time keeping one of my hens from sitting on every egg she saw. I only have time to collect eggs in the evening when I get home from work some days, and I really didn't want her sitting on all of them in the meantime. I decided to number some eggs and put them in the nesting box for her so she would leave the rest of my eggs alone, and because I am always secretly wishing for more fluffy butts. :) She sat on them all night and then for an hour or two during the day, then she would leave the nest and play with her friends. Oh well, at least she wasn't sitting on all of the eggs I planned to eat or sell. After about two and a half weeks I decided to candle the eggs, just to see. It turned out that there were actually babies inside! They were due to hatch on the 21st... nothing. After another week I decided to dispose of them before they turned rotten and exploded. I am always paranoid and decided to open one up just to make sure I wasn't committing mass murder, and sure enough, there was a poor little baby inside it. I was heart broken to have killed the poor thing. The eggs stayed in the nest. After a total of four and a half weeks, after putting the eggs in the nest, I found a poor sad little chick, still wet, but dead in the nest.
Come on guys, you are almost there!
Poor sweet little baby. :( Sometimes this happens, I thought, and left the momma alone. Unfortunately, it didn't stop there. I found 4 more babies, still wet, but dead in the nest. When I reached in another egg that was pipped chirped, and the broody started pecking at all of the eggs furiously! To my horror, I realized that she had been killing the babies as they hatched! Well that was just not going to cut it! I immediately went inside and started looking for something to make a make-shift incubator out of.
I took a large soup pot lined it with paper towels, and wrapped several bath towels around it. I put wet paper towels into soda caps to keep the humidity up but the bottom of the incubator dry. Next I put a thermometer in it, a sheet of plexiglass over it and set a desk lamp with a 60 watt bulb over it. I made sure the temperature was regulated by moving the lamp up and down until it stayed at the 37.5 degrees Celsius (99.5 Fahrenheit) and didn't change. Finally I went and got the eggs, making sure not to turn them, and placed them in the incubator in the same position that I had taken them out of the nest.
Wow, hatching is hard work! He somersaulted out of the
egg, landed like this, and laid there for several minutes.
He needed some rest!  
It was risky and I wasn't sure if I had killed them by moving them, but I figured that at least they had somewhat of a chance this way. Of course I watched the incubator like a hawk, and it killed me not to mess with them. Finally one pipped! And then another, and another! Three beautiful little babies hatched! One appears to be a pure buff orphington, the second an easter egger, and the third I think is a
New Hampshire Red X Easter Egger cross. I am so excited! There are 3 more eggs that are numbered and haven't pipped. I'm not sure if they will hatch, but I am leaving them for a couple more days just to make sure. She didn't exactly sit consistently.
Several more were laid after the original batch was put in the nest, so I am still hopeful that they will make, it will just be in a week or two. I have learned that I should always have an emergency incubator on hand just to make sure, but I am overjoyed that my little thrown together incubator worked! My real incubator came in the mail today. It will soon be loaded with turkey eggs!
All three babies hatched, and proceeding to fowl... uh,
foul the incubator. 
Because I only hatched 3 babies, and they are so much smaller than the babies that are in the chicken tractor brooder, I had to improvise a make-shift brooder as well. I used a large canning pot (they were hatched in a soup pot, right? May as well stick with the theme!), lined it with a plastic bag, filled it with pine chips, and connected another desk lamp to the side. Note so self... I really need more desk lamps. Apparently they come in handy. And more thermometers too! I am nearly out! Anywho, The problem with the canning pot was that I only have large waterers and they would take up the entire place. I used a 20 ounce soda bottle, lid removed. Wrapped some sturdy wire around it tightly, so the bottle won't slide up or down. turn the bottle upside down and bend the wire to make a hook. I filled the bottle with water and chick nutrients, turned it upside down into a small bowl, and hung the bottle over the side of the brooder with the opening of the bottle about 1/3 of the way into the bowl. Once the water fills to the opening it will stop. When they drink it will automatically refill to that point. Love it!
All fluffed up and in their brooder <3

Thursday, March 7, 2013

Blueberry Wine

My father in-law (to be) has been making wine for years. He has been trying to convince me to make blueberry wine since I moved down here. Finally, we managed to do it! The stores of blueberries that I had been hoarding in his freezer were getting out of hand and they needed to be used before they went bad. It was a much easier process than I ever guessed! Starting it only took about 30 minutes.

Ingredients:

1. 10 lbs blueberries
2. 4 gallons of distilled, spring, or good well water
3. 1 packet active dry wine yeast
4. 10 lbs of sugar
5. 4 tsp. yeast nutrients
6. 2 Tbs. Pectic Enzyme
7. 7 Tbs. Acid Blend
8. 2 Campden Tablets (crushed)

Steps:

1. First briefly rinse blueberries (blueberries are not cleaned before packaging or freezing) and try to remove any stems. Thaw if frozen.

2. Run the berries through a blender, just long enough to crush them up.Don't waste any juice, make sure it all ends up in the pot.

3. Pour berries into a very large (at least 5 gallon) pot or bucket. We used a large canning pot.

4. Crush campden tablets and sprinkle over blueberries.

5. Add acid blend, pectic enzyme, yeast nutrients, and sugar. Stir.

6. Add water and give it another good stir.

7. Put a lid on it and place it in a warm place over night.


8. After 24 hours, add yeast, replace lid, and let sit in warm place for about a week, until the fermentation starts to slow down. Just keep an eye on the bubbles, they will slow down. Stir everyday, preferably twice a day.

9. Strain blueberries from the liquid.

10. Allow the liquid to settle. Once settled, using a clear plastic tube, siphon the liquid out of the pot into a carboy leaving the sediment behind (he uses a 5 gallon water jug with a special attachment on the top. I didn't get any pictures of this part! Ugh! Next time!)

11. Repeat the last step at least 2 more times, spanning the time period of about 2 months. Some people say to do it at 2 weeks and again at 2 months.

12. Bottle the wine.

13. Enjoy! MmMmMm!